17 Dec

DragonScales: The Story of Archmage Cedric

This is the background story for the Archmage Cedric of the DragonScales games. If you have not played DragonScales 3 or DragonScales 5 yet, the following text contains several spoilers. All the art of DragonScales was created by our artist XKlibur: check her portfolio here.

Archmage Cedric
Archmage Cedric

The Archmage Cedric was one of the most powerful mages of the Gravity Kingdom. His command of the DragonScales magic was sublime, and that raised him to great glory and fame. Other mages of the kingdom respected and even feared him. In a sense, the Archmage Cedric was the epitome of success in sorcery and he achieved all he ever dreamt of. Once these men achieve all the things they want, their ambition grows even bigger, and they start bordering madness. This occured to Archmage Cedric. Suddenly, he started regretting his human condition, pitying himself for the weaknesses of his mortal vessel, the ugliness of pain, and then yearned for the absolute immutability of his body: he wanted to become an immortal.

Read More
11 Dec

DragonScales 6 game: Solution for Level 5-8

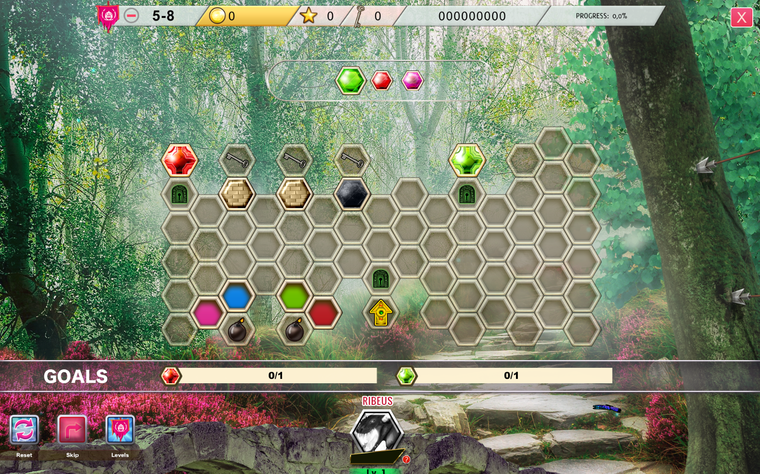
Some players of the latest DragonScales game, DragonScales 6: Love and Redemption, have reached out to us asking about a solution for Level 5-8. That level might seem a bit intimidating at first look, but once you figure out the little tricks for several parts of the board you’ll agree it’s kind of easy. Let’s take a look at the initial configuration of the board.

DragonScales 6 game initial configuration of Level 5-8
Initial configuration

A typical DragonScales board. We have two goals only: capture the red and the green cross-scales. There are some novelties, though, specific to DragonScales 6: keys and doors. Cells with a door icon won’t accept scales on them, so you’ll first have to remove the doors. That means you won’t be able to clear the top-left red cross-scale, or the green cross-scale or activate the arrow until you manage to remove the respective doors. To remove a door just click on it, but you’ll obviously need to capture at least one key beforehand. To capture a key, just form a combination containing the cell with the key.

Read More
08 Dec

Inversion of Control in Software Engineering

What is Inversion of Control in Software Engineering?

Inversion of Control in Software Engineering (IoC) is essentially a strategy for decoupling software components. Basically, the purpose of IoC is to remove unnecessary dependencies (couplings) which might reduce flexibility and elegance of a system’s design. The term Inversion of Control in Software Engineering might sometimes appear applied to different design contexts. It is a term that comes from the 70s, when bottom-up parsing was considered an inversion of top-down parsing. It has roughly continued to be applied in multiple contexts. Some people think Inversion of Control in Software Engineering is a design strategy. For others, it’s a design pattern. After some articles dealing with OpenGL, in this post we will briefly discuss this topic of Software Engineering.

Read More
04 Dec

Render a Triangle with OpenGL

This post will discuss how to render a triangle with OpenGL. In the following, renderization of a triangle assumes modern OpenGL, i.e., the old, fixed-function pipeline is of no concern for us in this post, as we’ll be using OpenGL buffer objects and shaders.

A Simple Triangle

By following the tutorials in the previous posts (Setting up Eclipse CDT for OpenGL and the GLFW Example) we were able to create a minimal program displaying an empty window. Now we want to draw something with OpenGL on that window, specifically, a triangle. Why a triangle? Well, the geometric shape more frequently used to approximate surfaces is the triangle. Approximation of 3D surfaces in real-time graphics by means of simpler shapes is known as tessellation. For our tutorial purposes, a single triangle will suffice.

GPU Power

Modern GPUs are quite fast and can also have a considerable amount of dedicated memory. When rendering, we’d like for as much rendering data as possible to be read by the GPU directly from its local memory. In order to render a triangle with OpenGL we’ll need, obviously, to transfer the 3 vertices of the triangle to the GPU’s memory. However, we do NOT want our rendering to go like this:

  • read a vertex from our computer RAM
  • copy it to the GPU memory
  • let the GPU process that single vertex
  • and then repeat this whole process for the next vertex of the triangle.

Ideally, what we want is to transfer a batch of data to the GPU’s memory, copying all the triangle vertices, and then letting the GPU operate with this data directly from its local memory. In OpenGL we have the concept of Vertex Buffer Object (VBO) to represent these data placed on GPU’s memory.

The data to render the triangle in OpenGL

Normally, we think of a vertex as a point, which in 3D space leads to a representation with 3 coordinates, commonly designated by x, y and z. However, in this case I’d like to think of a vertex as a more abstract concept: a minimal data structure required to define a shape. Given a vertex, we can “link” attributes to it to further define our shape. Thereby, one of such attributes of a vertex can be its position (the “x, y, z values”.) Other attribute might be the vertex’s color. And so on. In this tutorial we will “link” two attributes to our vertices: position and color. For position we will have three coordinates, each a floating point value. If a float takes 4 bytes, then our position attribute would require 3 x 4 = 12 bytes. For the color attribute, we’d have 3 extra components, following the RGB model. Each color component would then take 4 bytes, and the color attribute would also require 12 bytes. In total, each vertex would take 24 bytes, 12 for its position attribute, and 12 for its color attribute.

Now we have to specify how to process these vertices.

Read More
03 Dec

GLFW Example

Here I’ll briefly discuss a tiny GLFW example. Previously, I explained how to setup Eclipse CDT to work with OpenGL, using GLFW and GLAD. However, I instructed to copy-paste the example code on GLFW Documentation page, without providing any details. In the following I’ll present some code that you can add to the little project of our setup post, and will include GLAD initialization too.

Read More