23 Nov

How to use Spells in DragonScales 7?

Spells are a new feature of DragonScales 7: A Heart of Dark Flames. You can have up to 14 spells, comprising attack, defensive and healing spells. Using a spell is really straightforward: just load the spell on any of your playable scales, place the scale on the board, and then simply make a combination which includes that scale you placed on the board (the scale with the spell.) All the spells are activated like this. Here’s a video showing the activation of a few spells in the battle of Level 1-12.

The lightning spell will be awarded just by progressing in the game. However, the other spells have to be retrieved from the question marks on the boards. They are hidden in those question marks. The Avenger’s shield, for instance, is hidden in a question mark of Level 2-6. Once you get a spell for the first time from those question marks you’ll be able to replenish it in the Store.

DragonScales 7 How to use spells
Replaying the battle of Level 1-12 with all the 14 spells

These are the 14 spells you can get in DragonScales 7:

  1. Lightning: Automatically received in Level 1-9. Cast a lightning spell on the enemy currently marked as target.
  2. Multi-lightning: Cast a lightning spell on all your enemies.
  3. Spiky Mace: Try to kill a random enemy. It’s a cheap spell but its success depends on luck. You can improve the “luck” of this spell by rising the attribute “Luck for Killing Spells” with your Stars. “Luck for Killing Spells” also improves a bit when the Avenger levels up.
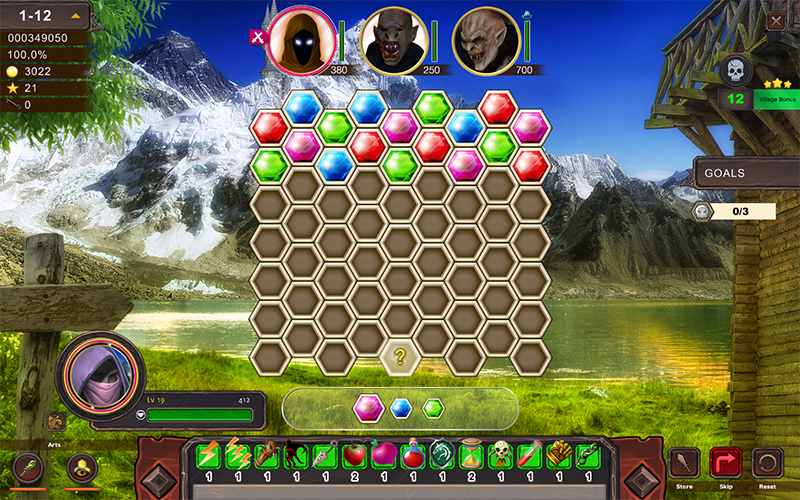
  4. Dragon’s Claw: Kill the enemy with lowest Health Points (HP.) It always succeeds. However, it’s an expensive spell and a few enemies (the ones with the little blue crown, such as the rightmost enemy in the above image) are immune to it.
  5. Dagger: Reduce 1/4 of the Health Points (HP) of all susceptible enemies. Again, enemies with the blue crown are immune.
  6. Apple: Recover 30 HP of the Avenger.
  7. Turnip: Recover 2 HP of the Avenger per each scale on the board. Therefore, it’s wise to place plenty of scales on the board before activating this spell.
  8. Red Potion: Recover all the HP of the Avenger.
  9. Avenger’s shield: Guard from 3 enemy attacks. It protects from direct attacks only. A few enemies have attacks that can go past this shield.
  10. Sandglass: Extend turn. Similar to the effect you get if you rise the Rank of the Avenger’s Village. However, the extra turns you get via the Sandglass are temporal. The extra turns you get from the Village are permanent.
  11. Berserker mask: Destroy all the scales placed on the board.
  12. Arts filler: Fill up your arts. You have two arts: a magical rod to break a single scale, and prescience to replace your currently playable scales. Both arts charge up a bit when you make combinations. By using this spell you can entirely fill them up at once.
  13. Hand of Power: Double the power of your next 3 attacks. This is for scales attacks only. It’s not wise to mix this Spell with the lightning or killing spells. Remember you can use the Stars you get in the boards to improve the status of the Avenger. If you improve the “Power: Basic Scales Attack”, the damage caused by your basic attacks (the ones resulting from simply forming combinations on the board) will be higher. This Spell is perfect for those players who rise “Power: Basic Scales Attack”. Furthermore, sometimes you’ll see a CRITICAL message when you attack (it depends on luck). When you get a CRITICAL you cause double the damage. As with “Luck for Killing Spells” you can also improve your rate of criticals with “Luck for Critical Attack”. Strategically speaking, rising this “luck for critical” goes well with rising “Power: Basic Scales Attack” too, and with being a frequent user of the “Hand of Power” spell. It depends on your play style. For example, you can totally forget about this spell and rely only on lightning spells.
  14. Chains: Silence a random enemy. The silenced enemy won’t be able to attack for a while.

If you need further tips and explanations about DragonScales 7, here’s a fantastic and complete walkthrough of the game.

21 Nov

Localization in Unity with No Such Localization

Localization in Unity with No Such Localization is easy and truly convenient. We used that package to localize our game 10th Corpse into several languages, and it was a straightforward process. When the time came to localize our game, we evaluated the localization options available for Unity. The canon choice, so to speak, is Unity’s own Localization package which, however, required us to update our project and also, at that time, did not have an expedited installation (it had to be installed manually.) In the long run, Unity’s Localization package is likely to become the standard and the first choice of Unity developers, but for now it’s still at the preview stage.

For 10th Corpse, however, No Such Localization was a wise choice. In fact, No Such Localization offers much more than what we really needed to localize our game, which only required localization of strings. No images and no audio had to be localized in 10th Corpse, but if your project needs that, No Such Localization easily allows for it.

What is No Such Localization?

It’s a localization package for Unity, and it comes in 2 versions: Lite and Pro. Both versions are available in the Unity Asset Store. The Pro version (paid) offers even more features, such as support for Right-To-Left (RTL) languages (Hebrew, etc.), automatic variable replacement, and translation source classes for JSON and CSV files (more about this in a while.) Even the Lite version is awesome and, as told above, it offers much more than what our game’s localization required. No Such Localization integrates naturally with the Unity editor, and requires no coding unless you want to extend its functionality. And that’s the beauty of the package: its architecture, which makes it a breeze understanding and extending its functionality.

How to work with No Such Localization?

Let’s first understand the architecture of No Such Localization. The official documentantion is here and is very good. You’ll work with 3 classes of components. The most important of these components is the LocalizationService. It’s the core of your localization, and you should have a single instance in your scenes (ideally, use DontDestroyOnLoad to have single, persistent LocalizationService object if your project comprises multiple scenes.) Just create an empty object and append a LocalizationService component. Now, in the Locales list, add the languages you want to support, e.g., English and German. There are a few attributes, but you’ll be mostly changing Current Locale. Once you complete the localization process, modifying this Current Locale will immediately switch your project’s content to the localized strings and assets corresponding to such language.

So, main component: LocalizationService. We have yet to work with other two components: ComponentLocalizer and BaseTranslationSource. LocalizationService is our core, our hub, the ruler of all the localization of your game. However, it needs to know what scene’s objects (strictly speaking, components) it has to localize, and it also needs to know where it’s going to find the content with which it will localize those objects. For instance, let’s suppose you have a Text object (again, strictly speaking, an object with a Text component) displaying a “Welcome” string. The LocalizationService can automatically localize that object, but it needs to know that such object has to be localized (that’s the responsibility of ComponentLocalizer), and it needs to know what content it will use to localize the object (that’s the responsibility of BaseTranslationSource.) You can subclass both ComponentLocalizer and BaseTranslationSource to adapt them to the requirements of your project, but No Such Localization comes with classes that will suffice for basic requirements. For instance, the package includes a TextLocalizer component.

In continuation of our example, let’s add a TextLocalizer to our Text object having the “Welcome” string. You’ll notice that the TextLocalizer component has a Phrase attribute. When localizing, you’ll have to remove string literals (e.g., “Welcome”) from your components and replace them with unique IDs. The localization components will used those unique IDs to identify the content. Place unique IDs in that Phrase attribute, e.g., welcome_text. Now we need a Translation Source with an entry for that unique ID, welcome_text. The package comes with a very basic translation source, StandaloneTranslationSource which we can recur to for a simple use case like this. Create another object, add a StandaloneTranslationSource component, and edit its Translation List attribute to add welcome_text as an entry of such list, with translations for Locale English and Locale German.

Localization in Unity with No Such Localization
Translation List of a Standalone Translation Source

That’s all. All the components of No Such Localization will connect among them automatically, and if you go back to your LocalizationService component and change the Current Locale you’ll see your text component modifying its content accordingly. It’s like magic!

Of course, if your project is medium or large sized, working with the StandaloneTranslationSource can be tiresome and error-prone. You might want to read your content from a file (the Pro version of this component comes with translation sources for JSON and CSV files.) The wonderful thing about architecture of No Such Localization is that you can extend it as you wish (we created our own Translation Source class for 10th Corpse.) And you can also create your own ComponentLocalizer for your specialized widgets, for example. You can localize text, images, sound, etc. Further information in the official documentation. An excellent tool for localizing your Unity project!

08 Nov

10th Corpse: Tips and Solutions

10th Corpse Tips

10th Corpse is, at its core, a Match 3 game with an eccentric set of characters and an eclectic array of gameplays. Here we present a few 10th Corpse tips and comments. The game comprises several minigames and challenges, specifically:

  • Match 3: 100 levels. There are many challenges. Collecting icons, destroying crates, boss battles, gravity-immune icons, free-swap icons, killing gargoyles, rechargeable icons, breakable tiles, buttons that show hidden cells, keys that must be led to doors, magnifying glasses that must be led to fingerprints, and much more. The player will also have 5 rechargeable power-ups. Here are some videos showing solutions for a few Match 3 levels of 10th Corpse.
Match 3: Level 1 of 10th Corpse
Match 3: Level 8 of 10th Corpse
Match 3: Level 18 of 10th Corpse
Match 3: Level 21 of 10th Corpse
Match 3: Level 86 of 10th Corpse
  • Arkadiusz Boxtrap: The goal is removing all the skulls which are placed on a board. In order to remove those skulls you’ll have to place pieces on the board, trying to form 3 x 3 areas of squares covered by your pieces (or 4 x 4, etc.) Skulls trapped in those 3 x 3 areas will be immediately destroyed. Each turn you’ll get 2 pieces to place on the board. By the way, pieces can be rotated with a right-click before placing them on the board.
10th Corpse: Level 5 of Arkadiusz Boxtrap minigame
  • Arkadiusz KOMBI!: Groups of pieces will fall down, following gravity, and you’ll have to move and rotate them in order to form rows or columns with 4 or more pieces to remove them. The levels’ goals require combining a few pieces of some color, or destroying all the monsters in the level. Include monsters in your combinations of pieces in order to destroy them. Pieces can be rotated, and you can switch between mouse or keyboard controls.
10th Corpse: Level 3 of Arkadiusz KOMBI! minigame
  • Trivia questions asked by Jake (a.k.a., The Lover of Wisdom) and questions by other characters: from time to time, the characters in Mansion Vinterfragen (especially Jake) will ask you questions. Jake’s questions are trivia questions, like how old was Napoleon Bonaparte when he was crowned Emperor (the answer is 35.) The questions asked by other characters are not usually of this type, and are more related to the personality of each of them. The player will have to try to guess which is the answer that each character would like. For example, Arkadiusz is a bit masochistic, and therefore it is necessary to answer him in the most cruel way possible (for example, there is a case where Arkadiusz asks what he should expect from the critics about his game, and the correct answer is “Expect pain!”.) In any case, if the player gets these answers right, some of her statuses for the Match 3 levels will go up (e.g., the power bar will fill up faster, or her attacks in the battles will be stronger, and so on). The player does not receive any penalty for incorrect answers. However, as mentioned, getting the answers right improves the player’s attributes in Match 3 levels.
  • Hidden Objects: There are 13 HO scenes. Most of them correspond to 9th Corpse, a game inside the game. One of the central characters of the game is Professor Arkadiusz, a game designer whose games pervade Mansion Vinterfragen. The player will be able to play a few of his games: the above referred Boxtrap and KOMBI!, and parts of a fictitious HOPA entitled 9th Corpse. All the hidden object scenes have hints that can be used without any precondition. Simply, after using a hint, you’ll have to wait a while for the hint button to become available again.
Level 2 of “9th Corpse” Hidden Objects minigame

Further 10th Corpse tips can be found in this fantastic and complete walkthrough.

The official page of the game contains additional details and screenshots. You can purchase the game here.