Our friend and guru Match 3 player Kathy Lew (SynthpopAddict) wrote this guide for our game Spooky Dwellers 2. Enjoy!
General tips:
The Menu button at the top right of the level screen is your go-to for anything you’d want to customize in the game. Check out the assorted buttons in the popup window to set the game up however you’d like. Wish all developers were this good with customization options! Everything is changeable at any time.
-The Help button brings up the collection of all the game help texts which otherwise appear in popups while you’re going along for quick reference.
-The object of most levels is to evict all the Spooky Dwellers, who hang out somewhere on the edges of the board by freeing and directing the light rays so the light shines on all the Spooky Dwellers, scaring them off. There will be assorted obstacles such as pumpkins, colored grass squares, and black rocks blocking the light rays, along with gadgets which may or may not be moveable to aim the light rays.
-A few levels have no Spooky Dwellers, just grass tiles to clear and pumpkins.
-You do not necessarily have to remove all the pumpkins, but the more you get rid of, the better your trophy when you finish. Remove at least half the pumpkins to get a silver cup and all the pumpkins for the gold cup. Pumpkins are more strategically placed in Spooky Dwellers 2 than in the first game, so you often do have to remove at least most of the pumpkins just to win the level.
-An improvement over several other M3 games done previously by IKIGames is that you do not always forfeit the level if you use your last move available in limited moves mode, provided that your last move wins the level. You will still get the “level failed” popup if you ran out of moves, but if the lights are still moving and end up finishing the level successfully, you get a “victory in the last move” message replacing the “level failed” popup. I do not know if this is also the case if you run out of time in timed mode with lights still moving.
Building the Playground:
-If you’ve played some other IKIGames releases, you’re familiar with the town or room scenes to construct, which in some games is necessary for gaining battle skills. In Spooky Dwellers 2, you get a Playground to build for the Spooky Dwellers to visit, which takes the usual “build a scene” to a whole new level. While this is purely for entertainment as there are no battle levels in Spooky Dwellers 2, the Playground is wonderfully designed; it’s another game in itself. And you get to build/rebuild it however you’d like, so have fun! The only limiting factor is you needing gold coins from playing the M3 levels and minigames in order to buy buildings and features for the Playground, so if you enjoy working on the Playground, make sure you play all the minigames since you get a lot of nearly free gold for playing the minigames.
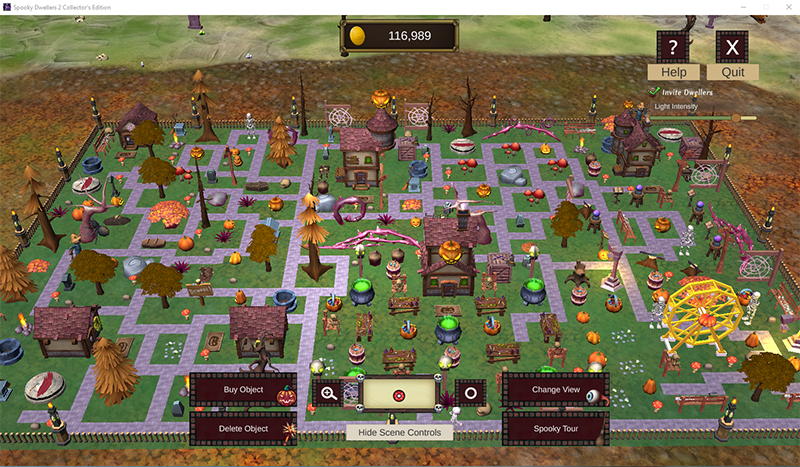
Using the controls in the Playground:
1) The rectangular box with the circle inside is a navigation tool. Clicking inside the rectangle moves the circle around, shifting the view of the Playground. Use this to center the area of the screen you want to start building in. If the control buttons are in the way of where you’re trying to build, your building will get canceled instead of being put into the grid.
2) You can also drag on the screen by holding down the left mouse button to manually scroll around the Playground if the rectangular box isn’t quite your thing.
3) To buy a building, click Buy Object. In the selection screen which appears, there are several buttons in the top left corner to choose from; this changes the menu of items below for purchase. Use the slider bar on the bottom or the little scroll arrows on the sides to move the menu around to see all the stuff. Click on the image of what you want to buy and it will appear in the Playground attached to your cursor. To put the item into the Playground, left click on the area of the grid you want to drop the item into. If you aren’t getting the building you want on the cursor, it’s because you don’t have enough gold to purchase that item (there will also be a message in the menu). Click the X on the top right of the menu to close the Buy Object screen.
4) To delete something from the Playground, click Delete Object and then use the mace which appears to smash whatever you want to remove. The gold coins which that item originally cost will be refunded to your stash. Hover the mace over the Cancel button to get out of deletion mode.
5) If you accidentally clicked on the wrong thing in the menu or change your mind on something, just hover the attached item over the Cancel button and it will go away.
6) The Change View button shifts between “top down” and 2 different side-angle views as you click on it. I usually like to use the “top down” view to see all the empty spaces left around my buildings better while building.
7) The small button which looks like it has a plus sign magnifying glass in it is a zoom button.
8) The small button with a plain circle in it is a “re-centering” button. Clicking this immediately re-positions you to the center of the Playground.
9) Clicking Hide Scene Controls lets you view your construction without the buttons all being in the way.
10) The “invite dwellers” feature is on by default. Once you’ve built some roads, Spooky Dwellers will automatically appear and begin wandering the roads. If you don’t like them, you can always disable this feature.
11) You can adjust the brightness of the Playground scene by moving the Light Intensity slider bar, but because the scene is by default already pretty dim, you’ll most likely want to keep it at the default setting to be able to appreciate the details.
12) To exit the Playground and get back to the game, click the Quit button.
Playground secrets:
-If you want to reposition something, right click on it and it will reattach to your cursor for you to move elsewhere. Left click to drop it as usual.
-If you hold down the Shift key while you have an item attached to the cursor, it will automatically rebuy that item over and over for as long as you have the Shift key depressed or until you don’t have enough gold left for buying said item to make buying several of one thing a lot faster.
-Wall and road pieces are on permanent automatic rebuy mode when you first buy one. To stop making walls or roads, you have to hover over the Cancel button.
-When something is attached to your cursor, right clicking rotates the item so you can customize the orientation of anything before dropping it into the grid.
Why the CE is worth it: There aren’t just more levels and some wallpapers.
-Some of the CE levels have new bedbug and worm Spooky Dwellers who live inside the playfield instead of hanging out on the edges. Match next to them until they leave. The worms will hop around randomly with every match you make next to them.
-CE exclusive minigames: There’s a bounce-to-hit game where you aim skulls using a slingshot to try to pick up all the coins and having a skull land in the cauldron awards you extra coins. There’s also a chain-to-match M3 game with a few twists, which I particularly enjoyed, even though chain-to-match M3 is usually not my thing.
-The CE version of the Playground has exclusive buildings/items marked with a diamond in the thumbnail image. Best of all, there’s a “Spooky Tour” option in the CE Playground where you get to virtually walk around inside the Playground and see your construction up close and personal, along with meeting the spooky residents if you invited them! Tip: if you want multiple Spooky Dwellers in the Playground, you need to build multiple roads or add random segments to a road if you’re like me and like to do one big loop. You must have at least one road built somewhere before the Spooky Tour feature is enabled.
-In order to do the Spooky Tour, click the Spooky Tour button, then click or drag on the roads which you want to “walk” upon and then press the start button. There are a few options in the Spooky Tour menu to adjust the “walking speed” as well as soften the turns. If you enable softening of turns, the screen will not abruptly shift 90 degrees at corners but do a 2-step process of shifting 45 degrees twice at corners. The speed at which the turns occur can also be adjusted.
-Ghost stories: Find out why the ghosts were in the house to begin with.
Partial walkthrough and random thoughts:
Many levels are relatively simple and can be figured out if you mess with them long enough. This walkthrough covers only levels which could be rendered impossible if you do things in the wrong order, or levels which have some sneaky feature.
Wait, your folks bought THIS place for their retirement home? “Oh come on, the realtor had us with the headless reader in the yard with a hopping skull getting mystified at said reader every night and a cleaver dripping blood stuck in the tree next to Poe’s Raven. Beats pink flamingo lawn statues!”
Jigsaw puzzle 1: Thanks IKIGames for reminding me why I should not hoard all the chocolate cake. But you might have to try harder if that cake had strawberry icing and filling instead…
Level 36: The pipes are on conveyor belts and you have to clear all the other stuff from the belts before the pipes will be in the correct location.
Level 38:
1) Clear the grass in the way of the light and pink pipe.
2) Rotate the pink pipe so the light goes to the left. The light on the bottom row lights up.
3) Clear all the pumpkins.
4) Move the arrow blocks.
5) Spin the pink pipe so the light goes to the right.
Level 40:
1) Move the upper arrow block first, then match on the right side of the conveyor belt to move the arrow block out of the top row. You don’t need to move the block all the way to the end of the belt, just out of the top.
2) Repeat this process with the remaining arrow block on the bottom so both arrow blocks are somewhere on the right side of the conveyor belt and not in the top row.
3) Clear the pumpkins on both sides, then the bottom. The arrow blocks will probably keep moving along the conveyor belt to the end. Do not charge the arrow blocks at all because if they move up again, you’re hopelessly stuck and will have to restart.
Level 41:
1) The trick to this one is to leave the 2 vertically paired pumpkins keeping the arrow block in place until all the other pumpkins are gone.
2) While clearing all the other pumpkins, mow the grass in the middle too.
3) Spin the pink pipe so the Spooky Dweller on the bottom right corner gets zapped by the light. Then rotate the pipe so the light goes up.
4) Once the light in the top right corner illuminates, you can safely remove the last 2 pumpkins and move that arrow block.
Level 44:
1) Leave those black rocks alone for now. Move the arrow block up underneath the black rocks.
2) Get rid of the rest of the pumpkins.
3) Rotate the pink pipe so the light goes to the right.
4) Carefully remove at least the highest black rock without fully charging the arrow block so the light can keep going to the right. If you accidentally move the arrow block here, you’re out of luck and will have to restart.
5) Spin the pink pipe so the light goes to the left.
Level 49: Like level 36, there’s a pipe on the conveyor belt and you have to get it all the way to the end of the belt before the light will go in the correct direction.
Jigsaw puzzle 4: Poor teddy bear…that ghost must’ve had some serious anger issues!
Level 55: You need to move the yellow key all the way to the end of the conveyor belt.
Level 62:
1) Leave the pumpkins closest to the arrow block alone for now.
2) Get rid of the other pumpkins and the grass tiles.
3) When the light in the bottom left corner comes on, remove the pumpkins by the arrow block and slide the arrow block out of the way.
Level 64: It’s not just enough to break the black rocks blocking the lights from the big Spooky Dweller, but you must also make sure the one pipe on the conveyor belt is all the way at the end of the belt to get all the lights to work properly.
HOS 7: Is it just me, or do all the HOS have a huge fish somewhere to try to torment me (if you’ve been following my guides for a while, you know the story behind this)? The developer will be disappointed to learn I can always spot the fish now. “Mom…Dad…if you think the spooky stuff in the yard beats pink flamingo lawn statues, then why the heck is there one of those flamingos in the living room?”
Jigsaw puzzle 5: Alligator 1, Human 0. The human still hasn’t figured it out, sadly.
Level 80:
1) Do not move the arrow block on the far left column. Just work on clearing out pumpkins. Don’t touch the arrow blocks in the center either for now.
2) As you remove pumpkins from the bottom, the rock on the conveyor belt will move up and around and eventually block off the light at the top right. This makes the yellow lock appear in the middle.
3) Finish removing the pumpkins, then move the 2 arrow blocks in the center out of the way. That arrow block on the far left can be ignored, but if you move it somehow, it will hit the rock on the conveyor belt and shouldn’t mess anything up.
Level 81: The trick to this one is to move the arrow block on the bottom left so it goes next to the hole in the board, then the arrow block which is next to the big Spooky Dweller so all the lights have a path. Get the pumpkins out of the way and it’s easy.
Level 85:
1) Move the arrow block in the top left. It lands on the conveyor belt.
2) Remove all the pumpkins on the conveyor belt, but do not charge the arrow block sitting on the belt. You will have to match on the right side of the board to keep moving things and get matches by the pumpkins working from the right.
3) When the arrow block reaches the end of the belt, charge the arrow block so it moves to the bottom of the board in between the other 2 arrow blocks.
4) Clear out the remaining pumpkins.
5) Move the 2 arrow blocks which are otherwise keeping the lights from reaching the Spooky Dwellers.
6) Rotate the pink pipe at the top so the light goes down and all the Spooky Dwellers should be zapped.
Level 86:
1) Get rid of all the pumpkins except for 1 or 2 immediately below the arrow block so the arrow block stays fenced in. The pipe should go all the way to the end of the conveyor belt while you’re doing this.
2) When the light on the left side comes on, remove the pumpkin(s) blocking the arrow block and move the arrow block out of the way.
Level 87:
1) Remove the pumpkins on the right half of the board without moving the arrow blocks.
2) If the pipe has not gone all the way to the end of the conveyor belt, keep moving stuff on the belt until the pipe is at the end.
3) Get rid of the pumpkins blocking the upward-facing pipe so the light goes up and around, lighting the lamp in the top right corner.
4) Remove the black rock blocking the arrow block at the top and move the arrow block out of the way.
5) Rotate the pink pipe so the light goes down and left.
6) Clear out the pumpkins on the left so the light in the bottom left corner comes on.
7) Remove the rest of the pumpkins and move the arrow block near the bottom.
Level 88:
1) As in level 86, this is a case of “don’t move that arrow block too soon”.
2) There are pipes on 2 different conveyor belts. Get both of these pipes to the ends of their belts. You’ll be clearing out at least some of the pumpkins to do this.
3) The light in the top right corner will come on. Clear out the rest of the pumpkins.
4) Remove the black rock and move the arrow block out of the way.
Level 90: Everything’s in the way of everything else with this one. And I thought this level was super hard when I first played it, but nobody else beta testing did. Must be losing my M3 touch for all that everyone tries to argue with me otherwise. This is why you’re stuck with me doing the walkthrough, LOL.
1) Get rid of all the pumpkins, but don’t move the arrow block.
2) The pink pipes will spin themselves while you’re working on the pumpkins. If the light in the top right corner hasn’t come on, rotate the pipes to direct the light up to the top right corner to get that lamp lit.
3) Rotate the pink pipes on the bottom so the light goes to the right and zaps the Spooky Dweller in the bottom right corner.
4) Get both pink pipes on the bottom to direct light up and sideways.
5) Get both pink pipes on the top to direct light down and sideways.
6) Get the pink pipe in the center to direct light vertically and left. This combination will zap the big Spooky Dweller on the left.
7) Without rotating any of the pink pipes, remove the black rock blocking the arrow block and slide the arrow block out of the way. This gets rid of the last Spooky Dweller. If some of the pink pipes rotated, set them back up as in steps 4-6.
You maybe need a skilled realtor at this point? I would’ve thought the realtor who sold the place to your parents was the best one ever! After all, the alternative is rather disparaging of your family.
CE bonus levels: Nope, not all the spooks are gone from the house after all. This place must be like the one in The Money Pit movie. Seriously, have you been paying attention to just how much that Playground has been costing you to build?
Level 93: The cup with fire lit or out is a conveyor belt switcher; pay attention to where the purple starting point of the belt is to determine which way the belt runs.
1) Remove the pumpkins and black rocks from the edges of the board as well as the pumpkins blocking the lights.
2) The blue key will move to the right on the conveyor belt and the unlit lamp in the center will come on.
3) Clear out the pumpkins blocking the cup and match by the cup so it has fire in it. The conveyor belt switches to moving leftwards.
4) Move the yellow key left all the way to the end of the belt.
Level 98:
1) Remove the pumpkins on the right half of the board.
2) The keys will go rightwards on the conveyor belt while you’re clearing pumpkins. Get the yellow key to the end of the conveyor belt so the light shines on it.
3) Move the arrow block so it lands atop the blue lock.
4) Remove the pumpkins on the left half of the board.
5) Light the fire in the cup so the conveyor belt runs leftwards.
6) Move the blue key left to the end of the conveyor belt to get the light shining on it.
Level 103: Bad pipes! Bad, bad pipes! Stop that spinning already!
1) Get rid of all the pumpkins and the black rock. This can be harder than it looks particularly in the bottom left, and the pink pipes are going to be spinning themselves while you’re doing this.
2) Clear the grass tiles, which causes the pipes to spin some more.
3) Rotate the pink pipe on the center right so the light goes right.
4) Rotate the pink pipe on the far right so the light goes down and lights a lamp.
5) Rotate the pink pipe on the far right so the light goes up and zaps a Spooky Dweller.
6) Rotate the pink pipe on the center right so the light goes left.
7) Rotate the pink pipe on the left so the light goes down and lights a lamp. If the lamp on the left lighted up earlier while you were working on the previous steps, skip this step and go to step 8.
8) Rotate the pink pipe on the left so the light goes up.
Level 106: Moving the arrow blocks does not make the level impossible; simply use the conveyor belts to shift the blocks out of the lights’ way (don’t charge up the arrow blocks again while the blocks are on the belt though).
Level 125:
1) Remove the huge amount of pumpkins on the right half of the board and move the arrow block in the far right column.
2) The lamp in the top right corner illuminates. Remove the pumpkins and black rock blocking the arrow block on the top row and slide the arrow block down.
3) Get rid of the 2 single pumpkins on the left half of the board and the black rocks on the far left column.
4) The lamp in the top left corner comes on while you’re working on step 3. If the lamp in the bottom left corner hasn’t lit up yet, move the arrow block on the conveyor belt to get it out of the way so the bottom corner lamp illuminates.
5) Clear the pumpkins closest to the Spooky Dweller, then work backwards towards the black rock and remaining pumpkins. Move the arrow block.
Level 127:
1) Clear out the pumpkins and black rocks but don’t light the fire in the cup. The blue key will go down to the end of the conveyor belt allowing one of the lamps on the bottom to get lighted.
2) Light the fire in the cup to switch the conveyor belt direction so the yellow key can be moved up. This lights the other lamp on the bottom.
3) Extinguish the fire in the cup and move the blue key all the way back down.
Level 131:
1) Remove the pumpkins, but do not move any arrow blocks. The Spooky Dweller in the top center will get zapped while you’re clearing pumpkins.
2) When all the pumpkins are gone, spin the pink pipe so the light goes to the right because you must zap the Spooky Dweller in the top right corner before going on. If you don’t get this Dweller before the next steps, the level will be impossible to finish.
3) The lamp in the far left column should have illuminated while you were rotating the pipe in step 2. Remove the black rocks blocking the arrow block in front of the lamp and slide the arrow block out of the way. (This cuts off the light at the top, which is why you had to do steps 1-2.)
4) Wait for the lamp on the bottom left corner to light up, then remove enough of the black rocks blocking the arrow block on the bottom row to slide it out of the way.
Level 135:
1) Get rid of the pumpkins.
2) Free the light’s pathway to the yellow key.
3) Move the arrow block on the left so the Spooky Dweller on the bottom is zapped.
4) Free the light’s pathway to the blue key.
5) Remove the black rock and move the arrow block in the way of the light and Spooky Dweller on the top.
Level 136:
1) Remove enough pumpkins to get the yellow key to the end of the conveyor belt (make sure the belt is running to the right). This lights a lamp in the bottom left.
2) Get rid of the rest of the pumpkins.
3) If the blue key did not go all the way rightwards to the end of its conveyor belt, move it there. It will be underneath the yellow key.
4) Light the fire in the cup to change the conveyor belts to leftwards.
5) Without moving the blue key, move the yellow key leftwards so the light can hit the blue key.
Level 138:
1) Clear the 3 grass tiles in the middle of the bottom row.
2) Remove the black rocks in the center so the arrow block above can slide all the way down.
3) Move the other 2 arrow blocks next to the arrow block you slid downwards in step 2.
4) Remove the rest of the pumpkins, black rocks, and grass tiles.
Level 145: Note which columns/rows the arrow blocks are located, and make sure you clear the grass tiles on the edges of those same columns/rows before moving the arrow blocks.
Now I’m going to eat my chocolate cake with strawberry icing and filling. Sorry, big ghost, you didn’t scare me off it.
Guide originally published on October 4, 2023. Revised on November 7, 2023.